....and I'm about 30 pounds heavier. That's right, I admit it. I've gained 30 pounds in the last three years. It's not pretty and I don't feel healthy. That has to change. For me, for hubby and for our future children. I was going to start on Monday but my anniversary is in less that an hour, why not start then?
My plan (it's simple):
Start my day with exercise and a healthy breakfast. I've cleared out the sunporch, which also houses a treadmill I should get my big butt on. which is a great place to do some morning yoga. I think I will start with Shiva Rea's Fluid power and work from there. Maybe find some belly dancing classes.
Eating well. Not dieting per se, since that simply hasn't been working. I'm going to cut back on the calories, and choose even healthier foods. I've been eating pretty well (until tonight's cupcake binge) but I need to eat less.
No wheat/ gluten. This should be a given because of my sensitivity, but I've been ignoring it a paying the price. Also not pretty.
Do more stuff for myself. When I am content and doing something I enjoy I don't snack as much or eat as much (quantity). I also tend to be moving more and burning those calories.
No birth control. Now, this sounds weird (and a "duh" for other reasons!) but I was on it for a whole month and gained 10 pounds- the 10 that really put me over the edge and could NOT seem to take off. UGH! No artificial stuff like that, thank you very much!
My goal: I'd like to loose 20-25 pounds. I'd LOVE to be my wedding weight again, but it was impossible to maintain for any length of time. That 5 pounds was a big pain, and I stayed comfortable at 136-140 reasonably easy.
So. Hopefully writing that out and putting it into cyber space will strengthen my resolve and this housewife will be better on her way to sassiness (so I can wear some sassy dresses and heals while I clean the house! and have the energy to do it!
Saturday, July 3, 2010
Monday, June 21, 2010
Contemplating Muchness
I bought the new Tim Burton revisit to Alice in Wonderland last week. Since purchasing it, I have watched it 3 times, and that was because I was showing restraint. It's AWESOME. I love that a lot of the story is straight forward, but there is plenty of good symbolism floating around in there. Not to mention it's just beautiful to watch- the graphics were awesome, and the costumes... GORGEOUS!
.jpg)
Sure, this story is about a young woman finding her strength, but can't that apply to all of us? The second time I watch this movie was with a very good friend that until recently I hadn't seen in almost 5 years, she leads a different life than I do, to me, a life much more adventurous. Anyway, there is a part in the movie where the hatter says to Alice: "You used to be much more...'muchier.' You've lost your muchness."
after the movie she brought up the idea of "muchness" and what that means... To me, she has so much, muchness, but she didn't think that was entirely so. It was any interesting conversation to say the least and it certainly got me thinking of my own muchness and my own life. Have I lost my muchness? did I used to be muchier? I don't know for sure but I worry I have and need to find it. What is muchness? And how can I reclaim my muchness? I've been thinking about this for days and answers are coming slowly.
I like that the whole story revolves around the question "who are you?" In the beginning, Alice was not hardly Alice but by the end, there she is. Alice. Not necessarily the most original idea, but it was a nice way to see it again. So what about me? Am I not hardly Ashley? When will I know I'm not the wrong Ashley? Hm... Well, at least with all the difficult questions there was a lot of pretty colors. :-P
Friday, April 9, 2010
Soup and sewing. Perfect
Well, our 80 degree weather is gone for now (which is probably good, because I got a bit of sunburn that needs healing...) and has been replaced with 50-60 degrees and rain. That's alright, I do like the rain. Plus, it's an excellent excuse for soup! I don't know how it got into my head, but this is tonight's recipe: Asperagus noodle soup.
Ingredients
half a sweet onion
Garlic. lots of garlic
a few tablespoons of good olive oil (I'm using the amazing one C brought back from Spain. YUM!)
a bunch of asparagus
1-2 celery stalks
A handful of baby carrots
White or baby bello mushrooms
Noodle of your choice
white wine and herb stock in a box
Veggie stock
Parmesan cheese
White wine.... for the chef.
Directions:
1. Pour yourself a glass of wine and take a good sip.
2. Chop all the veggies, slice the mushrooms, etc. Cut the Asparagus into oh, 1.5- 2 inch lengths (chunky) but set them aside.
3. In a nice, heavy bottom soup pot or dutch oven, pour some olive oil, about 2 tablespoons, add the garlic and onion and start to saute them, add the mushrooms and saute till soft
4. toss in the carrots and celery
5. Add all the stock, bring to a boil, let simmer for about 10 minutes or so. Salt and pepper to taste.
6. Add pasta of choice
7. When pasta is 2 minutes or so from done, add the asparagus
8. Top with parm. and drink more wine. YUM!
Serve with some good garlic biscuits or home made bread. If you want some extra protein, you could definitely brown up some chicken and throw that in there. Delicious.
Other than making and eating soup I'm heading to M-town with M in a little while to do some summer dress fabric shopping. yey! Then it's back home and back to work.
Wednesday, April 7, 2010
I'm up!!!!
I feel like I have been UBER busy lately! Running around, sewing, and taking advantage of the GORGEOUS weather. Easter was lovely, we went to the in-law's and my mommy-by-law made lasagna! YUM! I made a lemon poppy cake with pudding filling and butter-cream icing... with peeps on top. Sorry, I forgot to take a picture. :-( It was really nice to see the family, and have all us "kids" in one place.
I made my easter dress from the "anda" pattern available for home download at www.burdastyle.com Which is really nifty if you haven't tried it. You print out all the pieces in little parts, then tape it together and cut it out (alright, that sounded like a little more work that it was. But it was only $3.50 for the pattern). Not to mention, there are a ton of free patterns for download too.
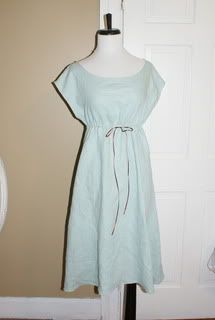
The dress itself is made from 100% linen in "meadow" from www.fabric-store.com (one of my favorite online stores!!!) I sewed the innards by machine with cotton thread, but because all the historical costuming has gone to my brain, I flat felled the seems and turned the hems all by hand with cream-colored silk thread. I really like the way it finishes, the flat felled seem is just so much nicer for this project than a French, and the detail of the handwork give the dress a unique quality which you are definitely not going to find at your average clothing store. My next one will have a more daring neckline for C's sake. :-P
Today, yet again, I have a very busy day. But it's going to be super fun. Today is the first meeting of the little craft club myself and Melissa are starting. It's a morning-ish session, so we are doing good girl projects: Dishcloths. :-P But cute crochet ones. This is a super easy (and cute one):
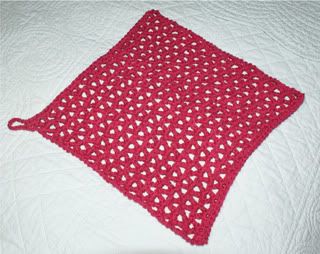
All it is, to make it, make a chain about as wide as you want you cloth, I like mine rather large, so if I fold to double the thickness, it is still nice and wide. Single crochet in each chain, then do a v-stitch. To start: Chain 3, skip two single crochets then double crochet, chain one, double crochet in one single crochet, skip two single crochets and repeat the v to the end. In the last single crochet, just do one double. Turn and repeat 'till you are at just about a square, single crochet across the top, at the end, chain 10-15 and slip stitch to last single crochet (to make loop). Weave in ends and you are finished. This look really cute on your tea tray, almost like a modern, casual doily, that you can mop up spilled stuff with!
Also for today I am making a sparkling mango, orange iced green tea. To make this you need...
7 green tea bags (or loose leaf tea)
4 cups boiling (or almost boiling) water
Mango Orange juice
Seltzer or other sparkly water (I actually am using raspberry for extra flavors...)
pitcher and wooden spoon
Steep the tea for about 5 minutes, you want it nice and strong. Let it get down to room temp and then put it in the fridge to chill.
After the tea is cold, put it in the pitcher (if you haven't already), add a good amount of OJ, maybe 3-4 cups. Right before serving, at the seltzer to taste and fiz level. Garnish with orange or lemon slices... or anything else that suites your fancy. (floating raspberry, mango slices.... whatever!)
You can also do this with cheap champagne. YUM!
So that's what's going on for today.
Monday, March 29, 2010
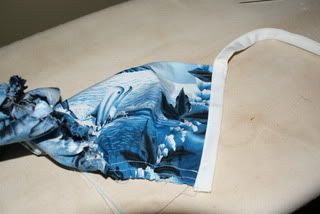
Apron tutorial finale
Sorry this took so long. I've been trying to outsmart the technology since Saturday. Ugh.

Anyway. To continue you should have both straps in place. At this point, the bodice it pretty much done...
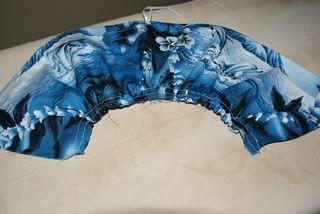
Step 7: Gather the body about 4 inches wider than the bodice (so you have a little wrap around action). Be sure to secure the pulling ends of the thread when you reach desired width.

Now working on the sash....
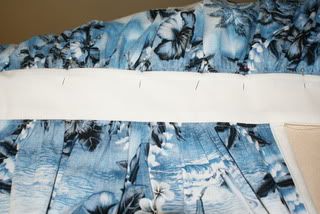
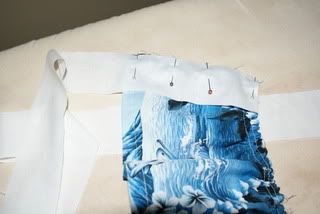
Step 8: Grab your bodice, and sandwich it between the two sash pieces. (be sure that it is centered.

Pin and sew the ENTIRE length of the sash, from end over the bodice to the other end. Making sense?
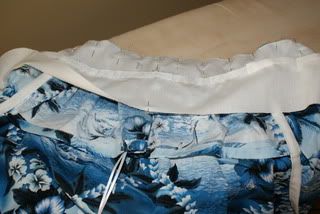
Step 9: Attach the body. This is a little tricky to explain....
Take the FRONT part of the sash and (again, making sure everything is centered) pin it to the body RIGHT sides together (bodice front will be facing body front).

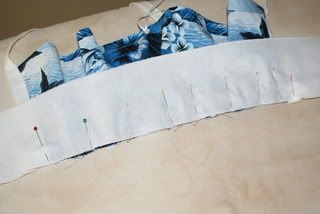
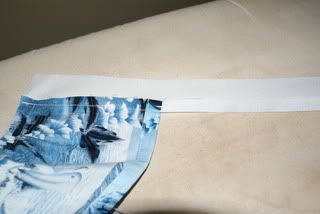
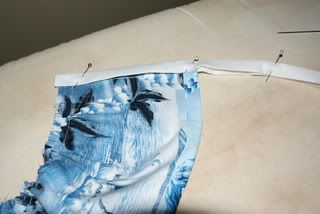
Step 10: Press the gathered part into the sash area, then press the seem allowance along the open lengths of the sash (both back and front pieces). Pin down even with the front of the sash.

(note, the bodice is at the bottom of the picture)
Sew from one end of the sash to the other, as close to the edge as possible.
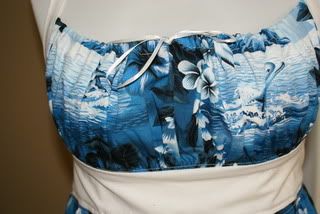
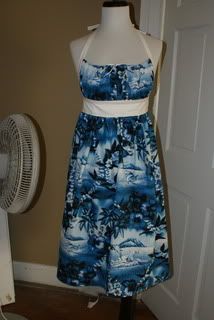
Step 11: Finishing
Clip all loose threads, turn over ends of straps and sash then hem them. Make sure to pull out any of the visible gathering threads, too. They are not pretty! But very very easily removed.
Tada!


Step 12: Wear it with sass!
(The lovely woman I made this one for put it on right away and said to her husband "look, I could wear this with nothing underneath to cook!" At that point we wondered if we should leave... LOL)
Extras:
My pink one has two chunky pockets that were made by cutting rectangles just about the size I wanted my pockets to be, hemming the top and pressing under seam allowance along the three sides. Then I top stitched them right onto the apron.
You could also make it a button closure on the back of the sash or the neck straps, and/or bring the straps straight back to the sash and sew them on (like bra straps I guess...)
Most important, make it your own and have fun! (And wear clothes under when company comes for dinner. )
Friday, March 26, 2010
Apron tutorial part 2
Now we are on to the trickier parts to explain.
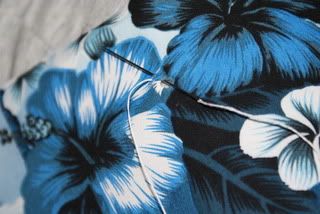

Preparing the bodice:
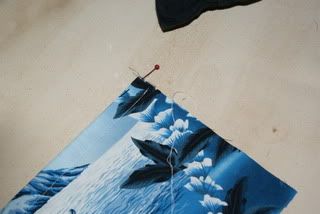
Step 4: Create top casing
Mark the center, about an inch and a half from the top, create an eyelet (for the draw-string) Or a small buttonhole.


Make the casing by folding and pressing about a quarter of an inch, then over about 3/4 of an inch (so the raw edge is inside the casing).

Pin and sew the casing down, close to edge.
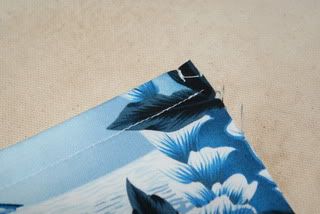
Step 5: Add ribbon drawstring
Cut a nice long length of ribbon- maybe 30 inches or so.
Using a large darning needle or safety pin, thread ribbon through casing, up through the eyelet, pin the ribbon to the casing opening, continue through the rest of the casing, and pin the other end to the other opening. You should have a loop of ribbon hanging out through the eyelet.


Stitch the end of the ribbon down.

Step 5: Gather bottom of bodice, using the same technique as the top of the body. Gather to about 12 inches for a small, or adjust to your size (this part should cover your boobs).

Step 6: Attach neck straps.
With right sides together, pin on of the neck straps along the side of the bodice and sew.

turn and press the seam allowance along the remaining length of the neck strap,

And along the opposite edge. Fold in half lengthwise, aligning the edges on the wrong side just behind the front (so you don't see it when looking from the front straight on). Pin and sew the length.


Repeat on the other side...
To be continued....
Thursday, March 25, 2010
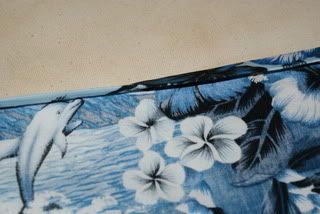
Apron tutorial part 1
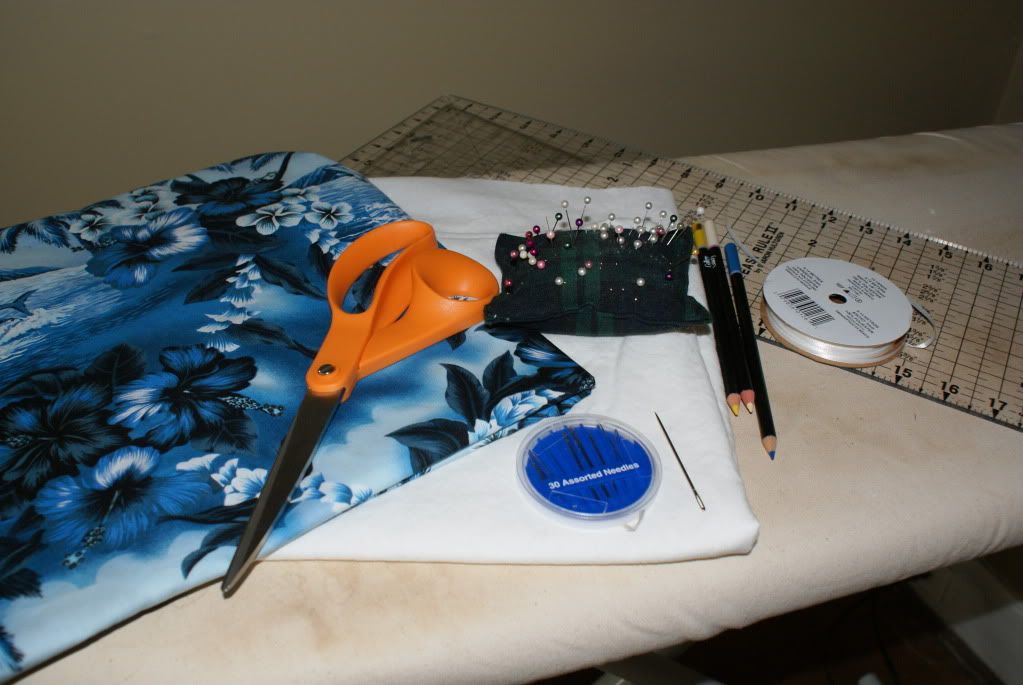
I love aprons... I made my pink confection a few days ago and got such a great response I decided to make a tutorial on how to make your very own. The one in this tutorial is for my friend for her birthday. I hope she likes it!
Step one, gather materials and tools:
1.25-1.5 yards Fashion Fabric
-.25- .5 yards contrast fabric for 'sash' and neck straps
-matching or contrasting thread
-20 inches thin satin ribbon for draw string
-Fabric Shears or rotary cutter
-Ruler or measuring tape and straight edge
-Sewing machine or hand needles
-Iron and board
Step Two: Cut out the parts
Cut a rectangle about 24 inches long by 6.5 inches wide, this will become the bodice.

For the body, cut a rectangle the width of your fabric by how long you want it to be from under the bust (does that make sense?) I used a 25 inch length for a short sassy apron for a tall lady.

For the sash cut two lengths the width of your fabric by 6.5 inches wide (I say 6.5 because it is the width of my measurer which makes it very easy....) Cut these in half lengthwise
For the neck straps, cut two pieces 25 inches long by 2 inches wide. This creates a somewhat narrow strap.

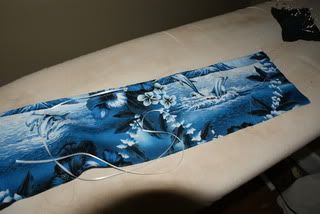
Step Three: Prepare body
Hem the body... Just do a quick, narrow hem around the bottom three edges of the body piece.

Then prepare the top for gathering. Using the longest stitch on your machine, run two parallel lines of stitching along the top. Be sure to anchor one end with a back stick and leave the other end with loose, long tails.

Mark the center of the top and set the body aside.
To be continued....
So I want to be a sassy housewife....
First and foremost, I would like to dispel this new 'myth' that housewives are outdated, frumpy, boring, losers or whatever (yes, these are adjectives that have been said to my face.)
I love being a housewife for many reasons. The most important being I love my husband and I want to make our home a fun, comfortable place for him to come home to (which I am working on....) I also get to go to school, work on side projects and in general pursue my own interests. What could be better?
But, I feel like the past year or so I have been slacking. I wear sweats all the time, I've been a little negligent in my cleaning and baking... over all, I feel like I've been a "bad" housewife, and it's time to turn that around. This "blog" is for my journey to better wifedom, a happy life and just random fun stuff I want to share with other sassy ladies.
Subscribe to:
Posts (Atom)